Home About me All the recipes. More or less organized Inspiration Wanna send me a note? Italian version

Garbanzo Beans Soup with Spinach and Saffron

Saturday, December 26, 2009
Garbanzo Bean Soup with Spinach and Saffron

A very very easy soup to detox from the various roasts, capons, tortellini, agnolotti (another shape of traditional stuffed pasta dish), duck a l'orange, local cold cuts, pate', Russian salads, panettoni, vol-au-vent, chocolate truffles, torrone and dried figs.
Even a short run would be good, though...


Garbanzo Beans Soup
with Spinach and Saffron

for 4 people

dried garbanzo beans 200 gr. (about 1 cup)
garlic 2 cloves
onion 1 small
vegetable bouillon cube 1/2
salt, pepper, olive oil, saffron to taste
fresh spinach 1 full bunch


The night before, soak the beans in plenty of water. The next day, drain and place them in a large pot. Let them simmer at low-medium heat covered with water until they are tender. Stir every once in a while and add more water if necessary. Depending on the beans and on how long they've soaked, it'll take between one and two hours. In a separate pan, saute the chopped onion and garlic in a couple of tablespoons of olive oil. Add the beans and their water, few saffron threads, 1/2 vegetable bouillon cube (optional), salt and pepper. Let simmer for another 15-20 minutes. If you'd like a lighter soup, avoid sauteing the onion and simply add garlic cloves, bouillon cube and saffron directly in the pan with the garbanzo beans and their cooking water.
Wash the spinach and discard their stems. Chop up the leaves and add them to the soup at the end, so that they'll cook just slightly. Stir well and serve with some olive oil and freshly ground black pepper on top. Yum....

Nutella Nutellae

Wednesday, December 23, 2009
Momemade Nutella

Nutella omnia divisa est in partes tres:
Unum: Nutella in vaschetta plasticae.
Duum: Nutella in viteris bicchieribus custodita.
Treum: Nutella sita in magno barattolo (magno barattolo sì, sed melium est si magno Nutella IN barattolo).

(Caius Julius Ferrerus, ah no, sorry, R. Cassini, Nutella Nutellae)

[This quote is really for my Italian friends, and it's impossible to translate properly. It's a latin-like poem on Nutella, which echoes the first lines of the famous De Bello Gallico by Julius Caesar]

How nice it was when the world was split in half, on this side Nutella, on the other side Ciao Crem (another brand of chocolate-hazelnut spread, popular in Italy in the 80's). And it was so easy to choose. Let's be frank, Ciao Crem has all my respect; after all it did its best desperately trying to differentiate itself with two flavors of different color, chocolate and hazelnut, mixed together in the same jar. And yet, despite the slogan Two Flavors: Two Kisses, Nutella has always remained the queen of afternoon snack, first promising energy to do and to think (popular 80's slogan of Nutella TV commercials) with its supposedly simple and natural ingredients; then cheering up the Nutella Rave Parties of our teenage years when, spread on top of giant slices of baguette, it was bore shoulder-high around the building (again, it was a scene from another popular TV commercial); and finally being packaged in reusable glass jars, that would pile up with no shame to bear perpetual memory of our addiction.

At home back in Italy we even had a 20-pound jar, which was sitting on the shelf in front of everybody. It was the Social Nutella, and whoever came in could not resist its call. Maybe it was because of the enormous proportions of the vase, or maybe it was the logo NUTELLA written in an extra large font, I don't know. The fact is that this maxi package would bring back primordial instincts and sooner or later everybody had to experience the thrill of sinking the spoon (when it was not a ladle) in a big ocean of Nutella, one where you couldn't see the bottom.

What follows here is a homemade version of the infamous spread. It may not be Nutella, but it's close. After all, if even Ciao Crem gave it a try...
Pass the bread, please. Or maybe the slice of panettone, since we are at Christmas time. But be advised, I don't guarantee on the side effects.


Chocolate Hazelnut Spread
(lacking in modesty, we could say Nutella-Like Spread)

for two medium-size jars

hazelnut 130 gr.
milk chocolate 200 gr.
sugar 120 gr.
low-fat milk 150 ml.
sunflower seed oil (or other neutral tasting oil) 90 ml.


The recipe is based on Elena di Giovanni's one, which has been posted many times on the Cucina Italiana online forum, and which has also been published by Paoletta, here. But I've used milk chocolate instead of dark one, in order to get a result closer to the original, even if maybe it's less satisfactory for those chocolate purists. And I've adjusted the quantities accordingly (in short, more hazelnuts and less sugar).

Toast hazelnuts in the oven, let them cool down, and then eliminate their outer skin. Put them in a food processor with a little bit of sugar (taken from the total amount) and grind them finely. Chop up the chocolate. Pour all ingredients in a pan with heavy bottom, place it on the stove at low heat, making sure the spread doesn't warm up too much. As soon as chocolate is melted, use an immersion blender to grind the hazelnut grains as fine as possible. Cook for 3 or 4 minutes longer, always stirring, until the spread is smooth. Pour the Nutella-like cream in the jars when still warm, and let it cool completely before sealing them.

Filipino Salted Eggs

Saturday, December 12, 2009
Filipino Salted Eggs

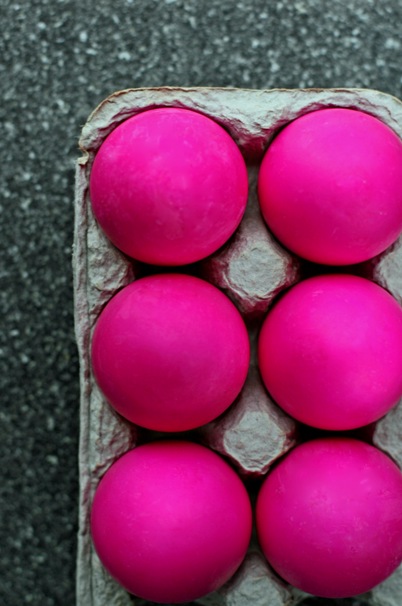
Check out what I found this morning at the Farmers' Market. I don't know about you, but I've never seen these futuristic eggs before.
I was walking around between the usual kiwis, cauliflowers, potatoes and grapes, when all of a sudden I caught a glimpse of something pink emerging from the booths. Pink??? Whatever it is, it has to be mine!
They told me that these are salted duck eggs, a traditional delicacy from the Philippines, where they are often sold by street vendors. To make them, you need to let them sit for few weeks in a solution made of water and plenty of salt, then you boil them with some red food coloring, so that they can be distinguished from regular eggs.
I don't quite know how to use them yet, but one thing for sure: now when I open the fridge, all of a sudden oranges seem pale, pomegranates dull, and apples faded.
Help!

Hide Bread

Thursday, December 10, 2009
Hide Bread

I made up my mind. My next 42 km will be in Big Sur. I write it here because that way I feel somewhat forced to keep the promise and I avoid getting strange ideas, like backing out at the very last minute. Some say it's one of the most beautiful marathons in the U.S., not as popular as New York or Boston, but certainly more spectacular for the course that runs along one of the most gorgeous stretches of the whole Pacific coast.

What does this have to do with the girl in the kitchen, you may ask? It's just that while thinking about Big Sur, I remembered this recipe, that I marked a while back with the usual yellow post-it so that I could try it as soon as possible. I found it in a beautiful book, The Big Sur Bakery Cookbook, one of those recommended by The Big Brother Amazon that all of a sudden you feel like you absolutely have to own.
It's sort of a culinary diary of this small restaurant/cafe', hidden behind a gas station along Highway 1. The tale of four friends who decide to leave the glamorous yet impossible scene of Los Angeles in order to pursue their dream in the middle of nature. With all its difficulties, like electricity that can be gone for days when the only power line connecting Big Sur to Carmel decides to break down, the suffocating feeling that hits at times when you live in a community of few hundreds people, or the financial risk of running a business that is largely based on tourism.

As usual, the first recipe that catched my attention is that of a bread, even if in this case it's not a leavening one, but rather a cross between Irish soda bread and English muffins (note to my Italian friends: mind you, English muffins are totally different than muffins, and they are more similar to English scones, which in turn are not to be confused with American scones...how confusing...I should stop here, otherwise this parenthesis will break into a new post).
In short, I warn you, these unusual rolls, quintessence of zen and healthy California, are not for everybody. What I mean is that they are not suited for the classic pane e salame, the crust is hard and crunchy and their crumb very dense and full of seeds that pleasantly creak under your teeth. They absolutely need to be sliced in half and toasted before eating, just like English muffins (which are not like muffins!!), and they are the best at breakfast, spread with jam and paired with a large, bottomless cup of coffee.
Now I know for sure. Next stop, Big Sur.


Hide Bread
for approximately 8 rolls>

all-purpose flour 2 and 1/2 cups (375 gr)
flax seeds 1/4 cup (50 gr.)
sesame seeds 1/4 cup (40 gr.)
oat bran 1 cup (120 gr.)
sunflower seeds 1/8 cup (25 gr.)
millet, amaranth, quinoa or poppy seeds, or a combination of any of these 1/4 cup (50 gr.)
salt 1/4 teaspoon
baking soda 1/2 teaspoon
beer 1/2 cup plus 1 tablespoon (60 ml.)
buttermilk, milk or water 1 and 1/4 cup (350 ml.)


I divided the recipe in half, the original amount is for 15 rolls of approximately 4 inches in diameter.
In a large bowl, combine all dry ingredients and stir well. Make a well in the middle, and add beer and buttermilk (or milk and/or water). Mix with your hand or using a wooden spoon until all ingredients are blended together and form a thick and wet batter. Slightly sprinkle the surface with flour and turn the batter on the work surface. Roll it into a log of approximately 2 inches in diameter, then cut it in slices about 1 1/2 inches thick. Pat them down with your hands and place them on a baking sheet lined with parchment paper. Bake at 375 for about 45 minutes, until the surface turns golden brown. Let them cool completely. Before serving, remember to slice the rolls in half and toast them well.

Meyer Lemon Marmalade

Monday, December 7, 2009
Meyer Lemon Marmalade

If you happen to be in California during winter months, don't think it twice and stock up on meyer lemons. Trust me, they are worth as much as a walk on Hollywood Hall of Fame or a visit to Beverly Hills.
Wikipedia tells us that these lemons are originally from China, where they're used as an ornamental plant, and they were introduced in California in the beginning of last century by Frank Meyer, an employee of the Department of Agriculture, from whom they've gotten their name.
I can also tell you that meyer lemons are somewhat in between a lemon and a mandarin, their skin is thinner than common lemons, they are sweet and incredibly scented.
Saturday morning my usual trip to the Farmers' Market should have been harmless, but these lemons were all over the place and I couldn't resist. My inner Grandma Duck woke up one more time all of a sudden and she didn't want to listen to reason. Thus, you get this one.


Meyer Lemon Marmalade

meyer lemons
water
sugar


A recipe somewhat minimalist, you may say, but quantities depend on the amount and size of lemons. I used 10 of them.
Wash lemons, cut off the ends, then cut them in half lenghtwise. Take out the seeds and keep them aside. Cut each lemon half in thin slices, and put them in a large bowl, collecting all the juice they might have released. Barely cover with water and refrigerate overnight.
The next day, weight lemon-water mixture and add approximately 70% of the weight in sugar (I've used 1,5 kg o sugar for 2,2 kg. of sugar and water).
Wrap the reserved seeds with a piece of cheesecloth, tying it like a small satchel. Add the cheesecloth to a pot along with the fruit, water and sugar, and let it simmer over low-medium heat, skimming if necessary. When the marmalade reaches the right thickness, discard the cheesecloth and pour it in properly cleaned and sterilized glass jars. Close them tightly, put them in a large pot filled with water, and let them boil for 20 minutes. Turn off the heat, and let the jars cool off in the same water to create the vacuum.

Ayva Dolmasi. A Turkish Affair, aka Lamb Stuffed Quinces

Monday, November 30, 2009
Ayva Dolmasi. Lamb Stuffed Quinces

I pack everything up and move to Turkey. I leave you a legacy of 153 cookbooks, many of which are still virgins, 74 types of cookie cutters, a pantry full of jams enough for the next 5 years, 12 types of flour, a notebook full of recipes, and an empty fridge. Yes, 'cause I decided I really like Turkish things, all of them, lamb, rose water, charred eggplants that are turned into puree, dried fruit mixed with chicken or red meat dishes, the barrels of yogurt, the spicy meatballs cooked on the grill.
I'm going to abandon my igloo and fly to the Aegean; I'll give up the never-ending Starbucks coffee and its paper cup for a nice cup of Kahve, black and strong; goodbye to spaghetti and tagliatelle, from now on only bulgur and pilaf.
At least until the next craze, Thai or Vietnamese, who knows?


Ayva Dolmasi
for 3

quinces, medium size 3
ground lamb about 1 lb.
onion, medium size 1
pine nuts 3 tablespoons
olive oil, salt, pepper, cinnamon, allspice to taste


The recipe comes from my last mindless appropriation, Arabesque: A Taste of Morocco, Turkey, & Lebanon, which won me over amidst another 200 books for its turquoise cover. No comment.

Wash the quinces, removing their downy coating, pat them dry and place them in a baking pan covered with aluminum. Bake at 320 for one or two hours (baking time will depend on the size of the quinces), until they're soft to the touch. Allow to cool down.
Meanwhile, finely chop the onion and sautee it in a little olive oil, until it becomes translucent. Add the pine nuts and toast them lightly. In a separate bowl, mix the lamb with salt, freshly ground black pepper, cinnamon and allspice. Add the onion with the pine nuts and stir well until you get a smooth mixture.
Cut quinces in half lengthwise and remove their core with a sharp knife. Scoop out the interior with a spoon, removing about 1/3. Chop the pulp you've obtained and add it to meat. Lightly salt the quinces halves and fill each one with a couple of tablespoons of the meat mixture, pressing lightly. Place them in baking pan lined with parchment paper and bake at 350 for about half hour.
If there's some filling left, you can make meatballs and bake them in the same pan with the quinces (or in a separate one) for the same baking time.

Tart with Grapes and Frangipane Cream

Sunday, November 29, 2009
Grape Tart with Frangipane Cream

Frangipane cream always makes an impression. It has a beautiful name to begin with, so sweet and intriguing at the same time. Frangi what?, they usually ask me when I make it. I don't quite know what it is, but the name sounds good. Eh eh eh....
And it's really good indeed, so almondiciously good that I recommend you always make plenty of it. Because, even raw, it disappears by the spoonful...


Grape Tart
with Frangipane Cream


For the Tart Dough
flour 250 gr.
sugar 100 gr.
butter 100 gr.
eggs 1
baking powder 8 gr.
vanilla extract 1/4 teaspoon
a pinch of salt


Sift flour and baking powder on the table. Take butter out of the fridge, cut it in small pieces and rub it with the flour using your fingers, until you get a crumbly dough. Make a dwell in the middle and put sugar, egg, vanilla extract and salt. Lightly beat these ingredients with a fork, then start mixing them with the flour using a spatula. Work the dough until it gets smooth, trying to be as quick as possible so that it won't get warm. Wrap in plastic and let it rest in the fridge for at least two hours before using it. You can also prepare the tart dough one or two days in advance and keep it in the fridge until ready to use it.


For the Frangipane Cream
butter 80 gr.
sugar 100 gr.
blanched almonds 100 gr.
eggs 2
flour 40 gr.
almond extract 1 tablespoon

To Finish
seedless red grape two or three handfuls
slivered almonds, confectioners' sugar to taste


For the cream: toast blanched almonds in the oven for few minutes, making sure they don't get too dark. Grind them finely in a food processor until they turn into flour. Beat eggs with sugar until they are fluffy, add butter cut in small pieces and keep mixing at high speed. Add flour, almond flour and almond extract and mix until you get a smooth cream. Refrigerate until ready to bake.
To bake the tart: roll out the dough and place it in the baking pan (I used a rectangular pan, approximately 14x4"), cover with parchment paper and put ceramic weights on top (you can also use some dried beans instead), so that the crust won't rise too much. Bake for 15 minutes at 350, take out the weights and parchment paper and cover with a thick layer of frangipane cream. Wash grapes and dry them thoroughly. Cut them in half and place them on top of the cream with cut side down, pressing them slightly. Cover with slivered almonds. Put the tart back in the oven and bake for about 30 minutes more, until crust and cream turn a nice golden color.
Let it cool completely, then dust the surface with confectioners' sugar.

No-Knead Walnut Bread

Monday, November 23, 2009
No-Knead Walnut Bread

- Sieti pronti...? Sieti pronti?
- Bene, anch'io.
- Sieti gia' caldi?
- Beeene, anch'io.
- Are you ready...? E allora, andiamo!

(Madonna L.V. Ciccone, Concert in Turin, September 4th, 1987)


AH-LEEEE-OH-OH, AH-LEEEE-OH-OH...
By universal demand, here comes again, the No-Knead Bread. And it arrives together with lots and lots of walnuts. Don't pull your hair, don't throw stuff on the stage, don't push, please. Instead, take a little flour, salt, water, and add walnuts to taste. Then sit back, relax, and be patient.
The recipe - obviously - comes once more from Jim Lahey and his My Bread, The Revolutionary No-Work, No-Knead Method, but this time I made some adjustments. The original recipe, as from the book, is the Laheyian version of Tuscan Pan co' Santi, made with walnuts, raisins, cinnamon and freshly ground black pepper. I simply took out raisins and cinnamon and add more walnuts.
So, Are you ready? Let's go!!


No-Knead Walnut Bread

bread flour 450 gr.
walnuts 120 gr.
salt 8 gr.
instant dry yeast 2 gr.
cool water (55-65 degrees F) 350 gr.
freshly ground black pepper to taste


In a bowl, mix flour, chopped walnuts, salt, yeast and a sprinkle of freshly ground black pepper. Add water and mix by hand or with a wooden spoon just until ingredients come together to form a slightly wet ball (you only need about 30 seconds). Cover with plastic wrap and let the dough rest at room temperature until it doubles and the surface is covered with bubbles (18 hours or more). This time, since my so-called-kitchen has all of a sudden become a walk-in refrigerator, I had to wait 25 hours before the dough was ready, so much for all my plans. The length of the first rise depends on the room temperature; when the surface is all covered with bubbles, the dough is ready.
Generously dust the work surface with flour. Place the dough on top, shape it into a ball and fold it in thirds. Place a kitchen towel on the work surface, dust it with wheat bran or flour and place the bread on top of it, seam side down.
If the dough is too wet, dust it with more flour or wheat bran. Fold the towel over it and let it rise one or two more hours. It should double. The dough is ready when, poking it with one finger, it holds the impression without springing back. I had to leave it there for 3 hours, again because of the polar temperature of my castle.
About half hour before the end of the second rise, preheat the oven to 475 degrees with a heavy pot inside: it should be super hot when you're ready to bake. Using the towel to help, quickly invert the dough into the pan, with the seam side up, cover with the lid and place it in the oven. Bake for 30 minutes, then remove the lid and bake another 15-30 minutes until the crust turns dark brown and crunchy. Let it cool on a rack before slicing it.


No-Knead Walnut Bread


I wanna see everybody dancing... Balli con me, cantate con me...
You can dance, you can dance if you want to. Get into the groove!
You can dance, you can dance if you want to. And you can dance!
For inspiration. Are you ready? Come on! [...]
Get up on your feet. Yeah step to the beat. Boy what will it be.


(Madonna L.V. Ciccone, Into The Groove, Concert in Turin, September 4th, 1987)

Cranberry Orange Jam

Wednesday, November 18, 2009
Cranberry Orange Jam

Cranberries are here, and I mean the real ones! After putting up with the dried ones for 10 months, in muffins, quick breads and more or less yummy salads, and after drinking liters of them in a juice form, finally here they come to the produce stores' shelves, plain and simple, just like Nature originally conceived them.
So forgive me, but now you'll have to put up with this jam. And if you don't find them in Italy, is this my fault?


Cranberry Orange Jam

fresh cranberries 1,200 gr.
sugar 700 gr.
granny smith apples 3
lemons 3
oranges 3
cinnamon, nutmeg to taste


Peel the apples and reserve their skin, drizzling it with some lemon juice.
Cut them in small cubes and mix them with cranberries, sugar, juice from the lemons, juice and grated peel from the oranges. Cover and refrigerate overnight.
The next day, cook the fruit mixture adding the spices and the reserved apple peel, which will be discarded in the end. Cook at low-medium heat, skimming when needed.
When the jam reaches the desired thickness, pour it in the previously sterilized glass jars, seal them and let them boil, covered with water, for 20 minutes.
Turn off the heat and let them cool in the same water to create the vacuum.

Roasted Yams with Cinnamon and Cranberries

Thursday, November 12, 2009
Roasted Yams with Cinnamon and Cranberries

Tell me something: why is that, that one buys maple syrup to make pancakes and cranberries to make muffins, and instead out of the kitchen come these potatoes? And how come that even before the potatoes are out of the oven, other recipes start sneaking into my schedule, pushing muffins and pancakes more and more down the list?
How hard is the life of a foodblogger...


Roasted Yams
with Cinnamon and Cranberries

for two

yams or sweet potatoes 1 large or 2 smaller ones
cinnamon, nutmeg, freshly grated ginger, salt, pepper, olive oil, fresh rosemary to taste
cranberries 1 handful
maple syrup 1 tablespoon
Dijon mustard 1 teaspoon
balsamic vinegar 2 or 3 tablespoons


Peel the potatoes and cut them into wedges. Mix them with a tablespoon of olive oil, salt, pepper, cinnamon, nutmeg, ginger and rosemary. Arrange them on a baking tray lined with parchment paper and bake at 425 for about 30 minutes, or until potatoes are soft. Meanwhile, mix maple syrup with vinegar and mustard and add one more tablespoon of olive oil. Pour the sauce over the potatoes, add the cranberries and stir. Bake for another 5 minutes and serve.

Beet Salad with Parmigiano and Ginger

Friday, November 6, 2009
Beet Salad with Parmigiano and Ginger

With 26.2 miles in my legs and the fifth marathon in my pocket, we slowly go back to the old habits.

Beside the medal, new aches and an undefined number of books that I purchased with no shame, this year I bring back again the memory of the notes of New York, New York that mark the start of the run on this side of the Verrazzano Bridge, of the sound of thousands of steps on Queensboro Bridge, of the screaming crowd that welcomes you warmer than ever at the entrance in Manhattan, of that 1st Avenue, slightly uphill, so long and exhausting, that you'd think it'll never end, of the excitement of entering Central Park feeling like you were the main hero, of the last 400 meters when you run through all your energies, and of the congratulations of people while you walk home in the late afternoon, wearing the unique medal around the neck.

To feel the excitement again and to be still under the illusion of living in Manhattan, I made myself this salad, tasted and tasted again in a very cool place in the Lower East Side. A pinch of ginger and the harmless addition of a little onion give a special touch that create the atmosphere of a calm New York night.


Beet Salad
with Parmigiano and Ginger

for two people

arugula and mix greens
beet, possibly of two colors(red and golden) 2
shaved parmigiano cheese
small red onion 1/2
freshly grated ginger to taste
salt, pepper, olive oil, balsamic vinegar to taste


Clean the beets by cutting the leaves and pairing the edges. Put them in a small baking pan, cover with water half way through and bake at 400 for about 45 minutes or until they are tender. While they are baking, turn them around every once in a while and add more water if needed. Let them cool off, then peel and cut them in small cubes. You can also boil them in water instead, but if roasted, the flavor is more intense.
Peel the onion and mince it finely. Add it to the greens and mix well. Prepare a vinaigrette by mixing olive oil, balsamic vinegar, salt and freshly grated ginger, and dress the salad greens with it. Cover with beet cubes and shaved parmigiano cheese. Sprinkle with freshly ground black pepper.

NY, I Love You

Wednesday, October 28, 2009
Gone Running

If This Town is Just an Apple, then Let Me Take a Bite...
(M. Jackson, Human Nature)


Mission NY.
Goals:

• 26.2 miles
• chasing Aldo Rock (famous Italian marathon and triathlon runner)
• pilgrimage to Sullivan Street Bakery to shake hands with Jim Lahey
• hunting for an alternative to Una Pizza Napoletana
• taking a stroll on Fifth Avenue to feel like Holly Golightly in Breakfast at Tiffany's
• shopping at Rizzoli Bookstore, hoping to meet my own Robert de Niro (remember this?)
• going for a walk In the Park, Barefoot or with the shoes
• homage to the famous diner on 112th Street, set of many Jerry Seinfeld's episodes
• admiring the 59th Street Bridge at night, sitting on a bench like Woody Allen & Diane Keaton, without thinking of the five bridges that are waiting for me
• a Long Island Ice Tea, but after the marathon : )


- Chapter one.
"He was as tough and romantic as the city he loved. Behind his black-rimmed glasses was the coiled sexual power of a jungle cat".
- I love this.
"New York was his town and it always would be".

(W. Allen, Manhattan)

Una Pizza Napoletana

Sunday, October 25, 2009
Anthony Mangieri
Picture taken from the New York Times official website


Anthony Mangieri, who is him?

Once upon a time there was a fundamentalist pizza maker, one of those who aren't willing to come to terms with anybody, no cheap mozzarella, no artificial yeast, no canned tomato sauce. Anthony Mangieri had a dream, pursued for years like the Holy Grail: understanding the secret of pizza, dissecting it, making it his own in order to be able to offer it to the rest of the world. Anthony Mangieri knew that Neapolitan pizza is a serious affair, a magic one needs to conquer with very few ingredients, but all of top quality. No tricks here, no superfluous additions: salt, water, flour and natural rising. Tomatoes, mozzarella, olive oil and basil. Take it or leave it. All the extras are banished, what do you need them for?

Not an easy challenge, in a market where spoiled customers are used to ask and get whatever they want: thick pizza, thin, square or round, with pesto or with chicken, well-done or half-baked, with pineapple or ham, or with everything at once, just tell me what you want and I'll make it for you. So-called pizzerias and take-out pizza on every corner, fast-food prices, who did he think he would compete with?

Una Pizza Napoletana was everything but a traditional American pizza restaurant. Right when you'd read the sign on the door, you could understand there was something odd:

"Open Thursday-Sunday
5 pm until sold out of dough"


Is this a joke? What do you mean Thursday to Sunday? And those who may want pizza on Wednesday, what are they suppose to do? And then, we are in the US, how dare you closing and taking a day off? And what's this thing that you may run out of dough? No, no, no, that's not possible, dough never ends. Until there's a client, there must be dough; it doesn't matter if it hasn't fully risen yet and if in reality it's supposed to be for tomorrow. Use it and that's it, what's the difference?

By the time you had read the menu, you didn't know what to think anymore: Anthony was a visionary or he was simply crazy. Una Pizza Napoletana offered only four pizzas, all of them variations on the same subject: Marinara, Margherita, Bianca and Filetti (with chopped cherry tomatoes on top). A swap between the same ingredients, tomatoes, mozzarella, olive oil and basil. Nothing more. Four pizzas. No salads, no appetizers, snacks or finger food. Not even dessert. Pizza like a religion, a fundamentalist faith to which Anthony would grant only one thing, some red wine from Campania, served in a carafe.

In reality, his visionary delirium was equivalent to a business suicide, the willingness to attract criticism and disapproval from hungry people. What? How come I can't make substitutions? And you don't even have pepperoni? Next time I'll think twice before waiting here for half hour... And yet, pizza was coming out as beautiful as ever, round, fragrant and steaming hot. And it was whole, as it should be, not already sliced or cut in half, American style. To everyone his own pizza, because for things like these it's right to be selfish.

And then there was this thing about the ingredients, all rigorously imported and carefully selected, chosen with a fanatical precision: organic flour, San Marzano tomatoes DOP (acronym for any certified Italian food product), sea salt from Sicily, extra-virgin olive oil that was more like a olive nectar, fresh buffalo mozzarella from Campania.

Those who want to understand will follow me, for all the others there will always be the other thousand and thousand of NY pizzerias. Those who wanted to understand patronized that tiny place in the East Village as if it were a temple, with the same worship and respect one has towards the Holy. I hope, Ho Fede, just like Anthony had tattooed on his fingers. Those who wanted to understand would never give up that brick oven for any other pizza in Manhattan.

Obviously, Anthony Mangieri was not crazy, and this idea of a hard-core pizza, he had got it right. His insane obsession for Naples - he was born in New Jersey and had never been in Naples - had taken him on the right path. And yet, at the height of his career, Anthony Mangieri took courage and decided that the East Village dream had come to an end. It was about time to give someone else the chance. Una Pizza Napoletana closed its doors few months ago, all of a sudden, with a simple Thank You message to the customers for the support and the love they showed him during the whole 5 years.

But those who know Anthony Mangieri, know that a man like him can't stop dreaming at 40: I want to make a change, man, he tells to the Diner's Journal reporter, the NY Times' blog dedicated to the restaurant business. I’m almost 40. I’ve lived my life between New Jersey and this neighborhood. If I don’t do this now, then when?

And you wanna bet that...

Squid Ink Tagliolini with Squash

Tuesday, October 20, 2009
Squid Ink Tagliolini with Squash

Few days in advance, here is my recipe for Halloween, taken from the latest issue of Gourmet Magazine. I even stole them the idea for the picture, because I really liked those tagliolini thrown against a black background with no plate.

And with this, I hope you'll forgive me for the canned pumpkin, since I really put a lot of effort into it. Not only I went to the Farmers' Market to buy a nice piece of squash yet to be cleaned, but I even made tagliolini from scratch, retrieving the Imperia Pasta Maker that was standing aside, nice and quiet, in the least accessible corner of my so-to-speak kitchen.
Trick or Treat? What about some spaghetti instead?


Squid Ink Tagliolini
with Squash

for 3 people

For tagliolini:
type O flour approximately 150 gr.
semolina flour 50 gr
eggs 2
squid ink 1 small package
(OK, I admit it, this comes from the package, but if you'd like to go hunting for the impossible fresh squid in San Francisco, please do...)


For the vegetables:
squash about 1 lb. (cleaned)
yellow pepper 1
garlic 2 cloves
shallot 1
black olives a handful
salt, pepper, red hot chili pepper, fresh thyme, olive oil


Peel the squash, discarding the skin and the seeds, and cut it in cubes. Wash the bell pepper, discard the seeds and the white filaments and cut it into small pieces. Place the vegetables on a baking tray, add garlic cloves and the shallot, peeled and sliced, season with salt, pepper, red chili pepper, thyme leaves and extra-virgin olive oil. Toss well, then roast at 425 until vegetables are tender (it will take about 25-30 minutes).

Meanwhile prepare your egg pasta as usual, adding black ink to color the dough, and then cut it into tagliolini (no explanation on the egg pasta, sorry...).
Cook tagliolini in salted boiling water, drain them after few minutes and sauté them shortly in a pan together with the vegetables, adding the chopped olives and few spoons of the reserved pasta cooking water. If you'd like, sprinkle with freshly grated parmigiano cheese (I think it'd go well here, but I omitted it out of respect for the packaged squid ink).

Pumpkin Walnut Bread

Wednesday, October 14, 2009
Pumpkin Walnut Bread

HURRAH for pumpkins! That is, even fall has a reason to be. So stop complaining, stop being annoyed and repeating that it's raining outside, that, oh bummer, you need to start wearing socks again, that your suntan has faded, that the next trip to Greece is over 10 months away, and that it gets dark too soon.
Go to any farmers' market, buy a ripe pumpkin, nice and sweet, and make peace with the world. Everything will turn a different color (something like orange, maybe?): cold weather becomes the excuse to turn on the oven, socks and UGGs are way more comfortable than little sandals and thongs, who needs a suntan when I'm so beautiful the way I am, how nice is the feeling of Christmas getting closer, along with chestnuts and panettone...

Now let me ask you: do you think you'll get the same effects with canned pumpkin?
Since by now I'm much more familiar with you, I can confess that these Pumpkin Breads - popular in the United States all year round, but definitely inflated between October and Christmas - are made with canned pumpkin puree, which is commonly sold in every supermarket. Nobody here will ever even think of starting from a fresh pumpkin, going through all the trouble of peeling and cooking it, when all you need is a can opener and you get the same result. (Note of the author: this may be obvious to US readers - how many are they by the way? One? Two? - Regardless, I know for sure that canned pumpkin will sound like a heresy to my Italian friends. Therefore the need to apologize and explain. Gosh! These Italians...).
OK, I know, I ruined all the romantic fantasy. May I offer you a slice and make peace with you?


Pumpkin Walnut Bread
for one medium-size loaf pan

sugar 170 gr.
vegetable oil 55 gr.
eggs 2
all-purpose flour 200 gr.
baking soda 1 teaspoon
baking powder 1/4 teaspoon
salt a pinch
fresh grated ginger 1 or 2 teaspoons
ground cinnamon, cloves, nutmeg, allspice to taste
pumpkin puree 260 gr.
grated zest of one orange
water 70 gr.
walnut 110 gr.


Lightly toast the walnuts in the oven, cut them in pieces and keep on the side.
Beat sugar and oil until creamy, add the eggs and mix well. Sift flour with salt, baking soda, baking powder and ground spices. Grdually add it to the egg mixture, alternating with the water. As when making muffins, batter should not be overworked, that way the loaf can have a light texture. Add pumpkin puree (canned, if you have it, otherwise be patient and make the puree from scratch, cook pumkin in the oven until tender, mash it throughly and then, if necessary, cook it in a pan until all moisture is evaporated) and the grated orange zest. At the end, fold in the walnuts.
Pour batter in a buttered and floured loaf pan, bake at 350 for about one hour or more, until a knife inserted in the middle comes out clean.
You can keep it in the fridge, wrapped in plastic, for 4 or 5 days.

Six-Spice Steak

Monday, October 12, 2009
Six-Spice Steak

Yesterday I ran for 20 miles, and today my leg muscles are raising a chorus of protest. However, this is not the only reason why I decided to make myself a steak. It's also because I had a score to settle with meat since the previous post; plus, again because of the above tagine, I find myself with a pantry full of spices, and any excuse for using them is welcome.

I found the recipe - definitely of Asian influences - browsing through an old issue of Gourmet Magazine. Don't ask me what kind of cut I've used, because I wouldn't be able to tell you (the recipe calls for hanger steak, but who can find that?). To each place its own steak cuts. All you need is to be friend with Mr Butcher, and the problem is solved.


Six_Spice Steak
for 2 or 3 people

For the meat
beef steak, about 1,5" thick, cut lengthwise about 3/4 lb.
Sichuan peppercorns 1 tablespoon
whole black peppercorns 5 or 6
fennel seeds 1/2 teaspoon
anise seeds 1/2 teaspoon
cinnamon stick 1 piece, about 3/4" long
cloves 3
dark brown sugar 1 teaspoon
salt a pinch

For the sauce
soy sauce 3-4 tablespoons
rice vinegar 1/2 tablespoon
water 1 tablespoon
freshly grated ginger 1/2 tablespoon
dark brown sugar 1 teaspoon
minced shallot 1/2
minced garlic 1 small clove
fresh cilantro, chopped to taste


Preheat broiler. Lightly grease the pan where you'll cook the meat. Grind all spices in a food processor with sugar and salt until they're almost pulverized. Rub the meat with the spice mix and spread it evenly over it. Arrange meat on the pan and broil close to the heat, about 4 or 5 minutes per side (it must be on the rare side).
Remove meat from the oven and let it rest for about 10 minutes. Collect the juice that's been released, add it to the rest of the ingredients for the sauce (except cilantro) and let it thicken on the stove for a minute.
Brush the steak with the sauce and sprinkle it with the chopped cilantro. Cut it into thin slices and serve over a bed of salad.

Lamb Tagine with Cinnamon and Dried Prunes

Thursday, October 8, 2009
Lamb Tagine with Cinnamon and Dried Prunes

I'm sorry, the lamb ran away. The rest of the ingredients (more or less) are all assembled here. True, we're missing the main character, but he didn't feel like showing up in front of everybody, looking such a mess. And he put it off to the next tagine.

The reason may be known, or at least may be understood by budding foodbloggers like myself. Photographing meat is so damned difficult; no matter how nice is your serving bowl or how well the dish turned out to be. It's already hard to take a decent portrait of photogenic subjects such as cookies, tarts or croissants (not that I've ever tried to make croissants, but let's not split hairs here....). So, it's already difficult take a decent photo of subject that are beautiful per se, let alone meat! Even worse if it's something with undefined outlines, like goulash or stews. What you've prepared with so much care (for this recipe, it took me one hour only to make the list of the spices I needed...) turns into an undefined brownish patch that would make anybody loose their appetite.

Yet, I really wanted to share this tagine, because it's delicious. Therefore, picture or non picture, I decided to palm you off with this post. I put together this patchwork-recipe looking around in the web and in all those books that I haven't put on sale yet. Cooking for so long with the spices, the lamb acquires a very distinctive taste, and most of all it becomes so tender that I still can't believe I made it myself (...I've never had a great relationship with meat). The most exciting thing is that while the meat is cooking, such an incredible scent will spread around your house (or your 20 square meters) that you'll feel like The Mistress of Spices. And I wouldn't be surprised if your neighbors, following the scented trail with their nose, will knock at your door with some kind of excuse, hoping in your famous generosity.

To avoid any misunderstanding, tagine is literally the name of the pot with a conic lid - usually a clay pot - that is widely used in Moroccan cuisine - and North African cuisine in general - for this type of recipes. The tagine is ideal for slow cooking, because thanks to its structure, aroma and steam are retained in the inside, and the meat turns out very tender and tasty. And with all the gadgets that I already own, how could I do without a tagine?
But let's come to the point, here is the recipe. Trust me, it's not your usual piece of meat.


Lamb Tagine
with Cinnamon and Dried Prunes

for two

lamb meat, cut into 1 1/2 inch cubes about 1 lb.
paprika, salt, pepper, fresh ginger, turmeric, ground cinnamon, cardamom, cumin, coriander, cloves, cayenne pepper to taste
whole cinnamon sticks 2
red onion 1/2
garlic 1 clove
saffron to taste
white vine 2 or 3 tablespoons
honey 1 or 2 tablespoons
pitted prunes about 10
olive oil


The night before, toss the lamb with one tablespoon olive oil and ground spices (paprika, fresh grated ginger, turmeric, cinnamon, cardamom, coriander, cloves, cayenne pepper, and cumin). Cover and keep it in the fridge.
The next day, heat one tablespoon olive oil in the tagine, add meat with all its spices and let it brown on all sides. Take it out of the pan using a slotted spoon, add another tablespoon olive oil and cook garlic and onion, thinly sliced, for 5 minutes, adding some water if needed. Put the meat back in the pan; add salt, pepper, whole cinnamon sticks and the saffron previously dissolved in the white wine. Add water to almost cover the meat, put the lid to the tagine and let simmer for about one and a half hour, stirring occasionally. If needed, add more water, and adjust the taste with salt and spices.
Now, add honey and prunes. Let cook for another 15/20 minutes until meat is tender and the sauce thickens.
Serve with couscous.

Lychee, Raspberry and Rose Water Jam

Sunday, October 4, 2009
Lychee Jam with Raspberries and Rose Water

Ok, ok, I know, I am a little late with the post. This one is a slightly disconnected post... Because in reality I made this jam few weeks ago, after buying the last available lychees from a produce store in Chinatown. And instead of fixing myself a martini, I decided to throw them in the pan.
Needless to say, I freely adapted this recipe from Christine Ferber's book again. How boring.


Lychee Jam
with Raspberries & Rose Water


lychee, peeled and pitted 2 and 1/4 lb.
raspberries 1 lb.
sugar 1 lb.
lemon 2
rose water 1 and 1/2 ounces
green apple 2


Peel and pit the lychees. Cut them in pieces and put them in a bowl with raspberries, juice from the lemons and sugar. Cover with plastic and let it rest in the fridge overnight.
The next day, place the fruit mixture in a large pot, add the peel from the apples and bring it to boil, skimming when needed. Few minutes before the jam reaches the desired thickness, add rose water and stir well.
Discard the apple peel, pour the jam in cleaned and sterilized glass jars, cover with lid and let them boil in a large pot full of water for 20 minutes. Turn off the heat and let the jars cool in the same water to create vacuum.

Grappa with Cumin Seeds

Monday, September 28, 2009
Grappa with Cumin Seeds

Sometimes the city plays tricks on you. Suddenly one night you look up to the sky and you realize that somebody stole all the stars. And the trees, the mountain trails, the scent of the grass. The green meadows are no longer there, nor are all the colors of the fall. Somebody stole the rocks, the smoking chimneys and the sound of the bells. And what happened to the casual encounters in the piazzas, to the lazy Sundays and the espresso after lunch? Somebody even stole sunsets, fresh spring water and silence.
An abstemious thief, though. He left me the grappa. So let's have a drink.

In case you're in doubt, Cjariei is the dialect term for Grappa with cumin seeds, or mountain fennel seeds. They say it has great digestive and therapeutic effects. At the second glass it'll wash away homesickness and it'll offer you in exchange visions of pink sunsets in the Dolomites.

I tuoi pensieri un po' ubriachi, danzando per le strade si allontanano,
ti son sfuggiti dalla mano e il giorno sembra ormai così lontano
e il giorno sembra ormai così lontano...


[Your thoughts, slightly drunk, are dancing on the street and going away, they slipped out of your hand and the day seems already so far away, the day seems already so far away...]
(Francesco Guccini, Night Song)


Cjariei
(Grappa with Cumin Seeds)


grappa at 40 degrees one 350ml-bottle
cumin seeds 25 gr.
sugar 70 gr.
water


Mix grappa with cumin seeds, close the vase or the bottle with the lid and let macerate for at least one month, stirring every once in a while.
After this time, dissolve sugar in a little bit of water, obtaining a sort of syrup. Add it to the grappa, and let it rest for another month. Again, remember to stir the mixture every once in a while.
Filter the grappa and pour it back in the bottle

Cloudy With a Chance of Meatballs

Wednesday, September 23, 2009
Cloudy with a Chance of Meatballs

Last time I found myself inside a brioche I was in college. Back then, young and broke, we were sharing a glorious and crumbling apartment located right above a pastry shop. And every morning it was the same story: they started taking stuff out of the oven around six and the tricky smell of croissants was going up the walls, turning my calm dreams of glory into surrealistic nightmares. If I was lucky, I'd find myself swimming in a cloud of leavening dough, with my hair smeared with apricot jam. In the worst case scenarios, instead, I'd struggle inside a swimming-pool of chantilly, or I'd plough with difficulty a sea of ganache cream abroad a beignet, while sugar crystals were hailing from the sky.

Instead of a brioche, this time I found myself inside a Jell-O castle and wearing a pair of 3D glasses I could enjoy the show fully awake and sitting comfortably on a chair, without risking a painful awakening.

What am I talking about? Drank too much? Smoked something weird? No, don't worry; it's just Cloudy With a Chance of Meatballs. Everything's clear now, isn't it? If not, look here and give yourself way to pancakes' showers, colorful ice-cream's mountains, rivers full of syrup and spaghetti tornados.
Be aware of meatballs, though.

Steamed Gingerbread Pudding - Christmas Rehearsal

Sunday, September 20, 2009
Steamed Gingerbread Pudding

How nice when Christmas used to arrive only in December, when you'd decorate your tree using leftover, mismatched adornments from the previous years, and when making The Christmas Crib was not politically incorrect. In those days it used to snow in buckets and it was no news, after all it was pretty normal for winter.

I'd like to teach the world to sing, in perfect harmony…

Don't worry, I am not crazy nor have I taken some suspicious substances. Simply, I'm abreast of the times. A late September Sunday, I take a stroll around the city, and enjoy what may be the last sunny day of an Indian summer.
Instead, they want to convince me that Christmas is coming soon and that I, as usual, am behind. Seducing windows are suggesting festive messages and show stylized snow flakes, at Starbucks they started selling Gingerbread Lattes, the real gem of the entire Holidays, and all of sudden I want to sing Last Christmas and go robbing the mall to take advantage of sales, end-of-summer or pre-Christmas, whatever. From now until December 25th, it'll be a mawkish crescendo, a river full of molasses running before the flood, obstructed only by Halloween pumpkins and Thanksgiving turkeys.

This year I decided to let it carry me away, sometimes I too want to be up with fashion, what's wrong with that? So I stocked up on molasses, ginger and cinnamon and got down to work.

Go to buy a tree but not a true tree because otherwise it would die die die die die
(Elio e Le Storie Tese, Christmas with the Yours)


Steamed Gingerbread Pudding
for one 9x5 inch loaf pan or two smaller ones

all-purpose flour 110 gr.
baking soda 1/2 teaspoon
ground cinnamon 1/2 teaspoon
ground cloves 1/4 teaspoon
freshly ground black pepper 1/4 teaspoon
fresh ginger, peeled and coarsely chopped 50 gr.
hot water 100 ml.
sugar 75 gr.
corn oil 75 ml
molasses 115 gr.
salt a pinch
egg 1


Sift flour with baking soda, cinnamon, cloves and pepper. Put ginger in a food processor, cover it with the water and blend until smooth. Pour it into a bowl, add sugar, oil, molasses and salt and beat well. Add the mixture of flour and spices, stir again and then fold in the egg. Keep stirring until batter is smooth and well mixed. You'll get a very moist batter.
Pour it in the previously battered pans and bake at 325 for about 1 hour and 10 minutes (45 minutes for the smaller loaves), or until a knife inserted in the middle comes out clean.
Let the cake cool in the pan for 20 minutes before inverting it onto a rack. Let it cool completely before serving.

They call it Pudding Cake because it's very soft and moist, something in between a cake and a pudding. It's perfect for those who appreciate ginger and spicy, mildly hot flavors, otherwise it's better to foist it on people who annoy you.
The recipe comes from Tartine Bakery's book which I've already told you about here. I divided it in half, because we have three months full of molasses ahead of us, and it's not polite to get indigestion already at the beginning of the party.

Tortillas (Project Panettone: Step 1)

Thursday, September 17, 2009
Flour Tortillias

I'd like to clear few things. I really, really love to have a finger in the pie, so to speak, get everything dirty with flour and watch the simplest combination of ingredients take shape. Being it for piadine (Italian flat brad), brioches or Tuscan bread, every dough that needs to be banged and turned over with no mercy somehow gives me deep satisfaction...

It's actually searching for the secret of Pizza Margherita that I ended up like this, writing about yeasts and jams instead of joining my coworkers for Happy Hour or watching American Idol on TV. One day I happened to ask Google if he knew something about pizza, and there you go, a whole world of forums, blogs and Cookaround opened up and didn't give me respite ever since.

Yet, as much as I enjoy sinking my hands into sticky and rebel masses, and smelling the scent of flour spreading in the air, sometimes laziness prevails and the option I'd rather buy it already made sounds much more appealing than a biceps workout. Maybe one day I'll have my own Kitchen Aid, a pink one, and maybe I'll have one, or even two work boards wider than 7 inches, and then you'll see me baking pizzas for the whole building.
While waiting for that happy day, I'd rather take it easy and do one step at a time, satisfying the gluten mania with less laborious projects. I've already tried the No-Knead Bread and the Irish No-Effort Bread, and I have a feeling that one day there'll be time also for Paoletta's No-Knead Pizza and for Ornella's No-Knead Brioches. But since today I feel particularly optimistic, I commit myself and I tell you that at this pace, walking up a leavening road that goes through piadine, popovers and half-hour breads, one day I will too - maybe - get to Him, the Supreme, the Impregnable, the Proud Panettone, ambition and dread of every foodblogger.

Meanwhile I started training with flour tortillas, the Mexican piadinas, so to speak. Mmmm... tortilla is very flat indeed, and I think I'll have to go a long way. OK, maybe not this Christmas, but one day... Panettone...I will too... And while drafting the stages of my route, I'll take a tortilla and spread it with avocado.


Flour Tortillias
for 9 tortillas

flour 300 gr.
salt 1 teaspoon
baking powder 2 teaspoons
vegetable oil 2 tablespoons
milk approximately 180 gr.


Heat milk in a small saucepan until warm. Mix flour with salt and baking powder. Add oil and mix well (I used a mild tasting extra-virgin olive oil). Gradually add milk and start kneading. Use only the amount of milk necessary to obtain a smooth, non-sticky dough. If needed, add more milk or adjust with more flour.
Work the dough for 5 or 6 minutes and then let it rest for about 10 minutes, covered with a kitchen towel. Divide it in small balls of about 50 gr. each. Slightly dust the work surface with flour and using a rolling pin flatten each ball into a thin round of approximately 6 inches diameter. If needed, pair the edges with a knife to obtain rounder tortillas.
Heat a cast iron pan and cook each tortilla about 30 seconds per side, turning it with a spatula and deflating any bubble that should develop. Tortillas can be frozen, wrapped in plastic. They should be served warm, filled with meat and/or cheese, hot Mexican salsa and avocado. If you like, you can also add shredded green cabbage, sour cream, grilled chicken or fish instead of beef.

Note (polemical): real tortillas should be made with lard, but finding it is really impossible. Or rather, you can easily find it only in Mexican markets and produce stores, but stay away from it... it resembles glycerin and it's full of hydrogenated fat, bleaching and deodorizing agents that make it last even YEARS outside the fridge. There is nothing else out there, because lard in North America has been stigmatized long time ago as too fattening and bad for your health. Today, if you tell someone that you're looking for lard, and that you need it to make tortillas or a nice and fragrant pie crust, they'll point the finger at you like you were a social order subverter. Meanwhile those supermarkets that are full of strange margarine, bleached fruit and food whose ingredients remind you more of a chemical formula like the ones you studied in high school, those not, they don't hurt anybody, and they're actually very generously open 24/7. To the delight of those who avoid lard like Satana, but have no problems gorging themselves on corn syrup.
Please forgive my ranting.

Pistachio, Yogurt and Olive Oil Cake

Monday, September 14, 2009
Pistachio, Yogurt and Olive Oil Cake

I have too many books (maybe). For sure I have too many recipe books. And less and less space to keep them.
Please note that this is not a sudden revelation on the way to Damascus, but the result of an infallible formula that takes into account the following factors:

• the total cubic feet available, times the hopes of getting a bigger place one day;
• the total possible recipes, divided by the number of days in one year;
• the difference between good intentions and the cost/time ratio of take-away;
• the average conversion to buy of the emails I receive every week from Amazon, where they tempt me with a Dear Sara, since you bought the fabulous Book on Jams, we thought you may be interested in the latest publication about Cream Puffs.

From whichever side you may want to take it, the formula yields always the same result: I have too many books (maybe). For sure I have too many recipe books. And less and less space to keep them.

With the objective of finding a remedy for this dramatic situation, I came up with the following strategy:
1) Take a random book from the shelf;
2) Open a random page of the aforementioned book;
3) Test the recipe;
4) If the recipe doesn't work, recycle the book by putting it for sale on Amazon(the proceeds cannot be allocated to the purchase of another recipe book);
5) If the recipe works, you're allowed to keep the aforementioned book;
6) In order to maximize the effort, use the final product of the test as subject of your daily post.

Needless to say, the cake under discussion here is the first act of this brilliant strategy. The book it comes from is safe for now, as for me, I may not be yet.


Turkish Pistachio Cake
with Yogurt and Olive Oil

for a 9" diameter spring form

pistachios, unsalted and without the shell 140 gr.
flour 125 gr.
baking soda 3/4 teaspoon
baking powder 1/4 teaspoon
salt a pinch
eggs, room temperature 6
sugar 150 gr.
plain yogurt 180 gr.
extra-virgin olive oil 85 gr.
cream of tartar 1/2 teaspoon
confectioners' sugar for dusting


Toast pistachios in the oven at 300 degrees, paying attention not to let them become too dark. Rub them between your hands to remove as much skin as possible, and then grind them finely.
In a bowl, sift flour with baking powder, baking soda and salt. Beat egg yolks with half of the sugar, until thick and foamy. Add yogurt, olive oil and mix again. Fold in flour and ground pistachios. In a separate bowl, beat egg whites with cream of tartar. When they are thick enough, add the rest of the sugar and keep beating until they are thick and shiny. Gently fold egg whites to the batter, paying attention not to make them go flat.
Pour the batter in a buttered and floured spring form, and bake at 350 for approximately 55 minutes. Let it cool on a rack, dust with confectioners' sugar and serve.

Spicy Carrot Ginger Soup

Friday, September 11, 2009
Spicy Carrot Ginger Soup

I really like soups, but for some reason I never remember to make them. Maybe it's a legacy from when I was a kid, when I couldn't stand them in any shape or color, or maybe it's because usually, without doing it on purpose, I end up making a huge amount that lasts for a whole week and makes me NOT want to eat soup for the next six months.

This time, though, it went better, and right after the first meal I can already see the bottom of the pan. Luckily, because I've already bought ingredients for at least another 10 posts that are on my waiting list.
It's very good though!


Carrot Ginger Soup
for 4 people

carrots about 600 gr. (net)
onion 1/2
garlic 1 clove
fresh ginger 1 piece approximately 1 inch wide
olive oil, salt, butter, curry powder


Peel the carrots, wash them and cut them in pieces. Mince onion, peel garlic clove and ginger and cut them in pieces. Sauté onion, garlic and ginger in a little oliv oil until the onion turns golden. Add the carrots, cover with water and let simmer at low-medium heat until carrots are tender (it'll take about half hour). Puree the soup until it becomes smooth. Bring back to boil, add salt and a tablespoon of butter and sprinkle with curry powder to taste.

End of Summer Tart

Tuesday, September 8, 2009
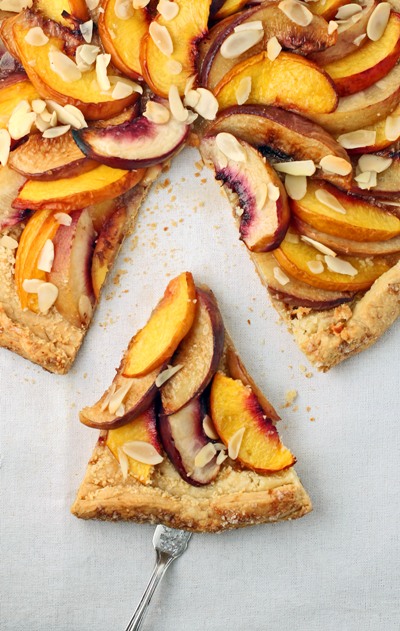
End of Summer Tart

They say if you learn how to make puff pastry, the whole world will be at your feet, Google will be your friend forever and Prince Charming will knock at your door bringing an electric mixer as a gift. Yet, despite all these tempting promises, I'm still not sure I want to attempt such labor-intensive dough, possibly wasting pounds of butter in many trials and spreading flour all over my so-called-kitchen.

Yesterday, though, I found this recipe for a semi-puff pastry, described as a good warm-up for those who are thinking of challenging the real deal one day, and I decided to give it a try. The source is Christine Ferber, the jam woman, who few years ago came out with a second book entirely devoted to tarts, both sweet and savory.

The result is really excellent, especially since the dough is quite simple after all, and it's also pretty quick to make (not considering the time it needs to rest and the time you'll need to read the recipe and to decipher the explanation of the process to follow).

I only have one question left: now that I know how to make a semi-puff pastry, do you think I have to expect a Prince without the mixer or am I allowed to ask for a mixer without the Prince?


End of Summer Tart

For the Semi-Puff Pastry
pastry flour 250 gr.
butter, very cold 150 gr.
sugar 1 tablespoon
salt 1/2 teaspoon
iced water 2-4 tablespoons


Sift flour on the work surface. Cut butter in small cubes and add it to the flour, tossing very quickly (in order to have a very cold butter, after cutting it in cubes I put it in the freezer for about 10 minutes before proceeding with mixing the dough). Make a well in the middle, add salt and sugar and a couple of tablespoons of water (which also has to be very cold). Start kneading the dough to combine ingredients, but take care not to overwork it and that the butter bits remain visible. If necessary, add a little bit more water, but in order to have a good result it's better to use as little as possible.
Shape into a ball, wrap in plastic and let it rest in the fridge for 20 minutes.
Now, lightly dust the work surface with flour, and using a rolling pin press the dough into a rectangle a little more than 1/2 inch thick.
Fold it in thirds, as if it were an envelope: fold the top third down and fold the bottom third over it, like wrapping it (much more difficult to explain it than to actually do it, I swear). Rotate the dough 90 degrees to the right, wrap it with plastic and let it rest in the fridge for at least another 10 minutes. From now on, pay attention to keep then same direction of rotation and to keep the same side touching the work surface (again, lots of words that simply mean that you have to put the dough in the fridge and take it out as it was, without turning it over and without rotating it in the opposite direction).
Dust the work surface with flour, roll the dough into a rectangle again and fold it in thirds exactly as before. Rotate the dough of another 90 degrees to the right. Wrap it in plastic and put it in the fridge for 10 minutes.
Now you have to repeat the process for the third time: roll it into a rectangle, fold it in thirds, and rotate it 90 degrees to the right. This is the third and last fold and it's better to do it the next day. Once you're done with it, keep the dough in the fridge for at least half hour before rolling out the tart base.


For the Tart
ripe peaches and/or nectarines, both yellow and white about 4
brown sugar 4-5 tablespoons
sugar 2-3 tablespoons
melted butter 4-5 tablespoons
almond flour 50 gr.
slivered almonds to garnish


Take the semi-puff pastry out of the fridge and roll it in a circle of approximately 1/8 inch thick. Prick the surface with a fork. Cover the bottom of the shell with almond flour (it'll help absorbing peaches' juice while baking).
Melt the butter. Wash the peaches and the nectarines, dry them with a kitchen towel and cut them in slices approximately 1/8 inch thick. Arrange them nicely on the tart shell, leaving an empty edge of about 2 inches. Fold the edge over the fruit, trying to seal it with your fingers. Brush the peaches and the edge of the tart with melted butter, sprinkle the fruit with brown sugar and the tart edge with regular sugar. Cover with slivered almonds to garnish.
Bake at 400 for about 40-45 minutes, until the tart turns golden brown.
Let it cool on a rack before serving.