Home About me All the recipes. More or less organized Inspiration Wanna send me a note? Italian version
Showing posts with label Cheese and Dairy Products. Show all posts

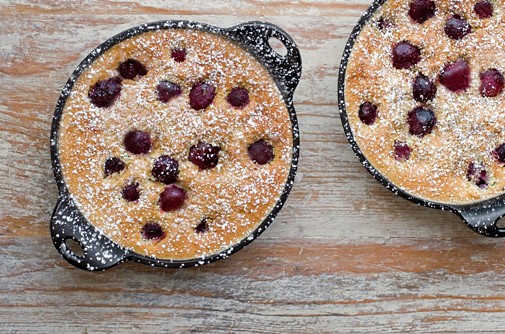
Cherry Clafoutis

Monday, May 31, 2010
Cherry Clafoutis

Leave every hope, cherries who enter (in my place).
(One Girl In The Kitchen)

I believe in destiny, of cherries. As far as I'm concerned, three are their options:

A) Preserved in their syrup;
B) Jam;
C) Clafoutis.

May it be clafoutis.
I think the sun must have gone to my head, today I feel like a little dictator.


Cherry Clafoutis
for a 9-inch round baking pan

cherries about 400-450 gr.
eggs 2
sugar 50 gr. + 3 tablespoons
flour 30 gr.
almond flour 1 tablespoon
heavy whipping cream 70 gr.
butter 1 tablespoon
vanilla extract 1 teaspoon
cinnamon, grated lemon peel, salt to taste
confectioners' sugar, to dust to taste


Not only a dictator, but even fundamentalist. There are a million of clafoutis recipes, the variations are as many as the stars in the sky, but one thing is certain. Purists say that to make clafoutis you must leave the pit to the cherries, because the dessert will have a more intense flavour and it will taste sligthly like almond. And we don't want to make it strange, do we?

Wash the cherries and cut the stalk. In a large pan, melt the butter, add the cherries, 50 gr. of sugar, grated lemon peel and a sprinkle of cinnamon. Cook for a little less than 10 minutes, until sugar has dissolved and the juice has thickened. Place cherries on the bottom of a 9-inch round baking pan (or use two smaller ones).
Beat the yolks with 3 tablespoons of sugar and vanilla extract until light and fluffy. Add cream, flour and almond flour and mix well. In another bowl, beat egg whites with a pinch of salt until soft peaks form, and gently fold them in the egg-flour mixture. Pour the batter over the cherries and, if necessary, stir it a bit so that cherries won't end up all on the bottom.
Bake at 375 for 20-25 minutes, until the surface turns a golden color. Let it cool slightly and dust with powdered sugar.

NoA: I recommend you remember telling your friends that the cherries still have the pit!

Homemade Ricotta

Tuesday, February 23, 2010
Homemade Ricotta

VINCENT: But you know what the funniest thing about Europe is?
JULES: What?
VINCENT: It's the little differences. A lotta the same shit we got here, they got there, but there they're a little different.
JULES: Examples?
VINCENT: Well, in Amsterdam, you can buy beer in a movie theatre. And I don't mean in a paper cup either. They give you a glass of beer, like in a bar. In Paris, you can buy beer at MacDonald's. Also, you know what they call a Quarter Pounder with Cheese in Paris?
JULES: They don't call it a Quarter Pounder with Cheese?
VINCENT: No, they got the metric system there, they wouldn't know what the fuck a Quarter Pounder is.
JULES: What'd they call it?
VINCENT: Royale with Cheese.
JULES: Royale with Cheese. What'd they call a Big Mac?
VINCENT: Big Mac's a Big Mac, but they call it Le Big Mac.
JULES: Le Big Mac. What do they call a Whopper?
VINCENT: I dunno, I didn't go into a Burger King. But you know what they put on french fries in Holland instead of ketchup?
JULES: What?
VINCENT: Mayonnaise.
JULES: Goddamn!
VINCENT: I seen 'em do it. And I don't mean a little bit on the side of the plate, they fuckin' drown 'em in it.
JULES: Uuccch!

(J. Travolta & S. L. Jackson, Pulp Fiction, second scene; if you...ehm...care for the Italian version, take a look here)

Ah, the little differences. How nice it'd be if one day I could drive around Hollywood in that old Chevy with Vincent Vega and Jules Winnfield. We could talk for hours about the little differences: ice cold drinks, salted butter, coffee in a paper cup, peanut butter & jam sandwiches.
One can get used to everything, mayo with french fries and triple, no-foam cappuccinos (???). But ricotta ...ehm..., sorry but on this one I'd have something to say. The little difference in this case becomes an abyss of taste and creaminess. Vincent, I swear. If Marsellus by any chance sends you over to Europe one more time, get yourself a dose of fresh ricotta, and then let's talk about it.
As for me, since there's nothing better around here, I cheer up with this.


Homemade Ricotta
for about 1 lb. of ricotta

milk 2 quarts
heavy whipping cream 1/2 cup
white wine vinegar 5 tablespoons
salt a pinch


To be precise, this is not really ricotta, since ri-cotta (as the name says, literally re-cooked) should be made by the cooking a second time the whey that's left over from making cheese. Regardless of the name, this thing is really good, and most of all, it's far better than any version I've been able to find at the supermarket.
In a large pot, mix milk, cream, vinegar and salt. Put on the stove at medium heat until it reaches between 195 and 205 degrees (what? you still don't have a cooking thermometer?). It'll take about 40 minutes. Turn off the heat and let it rest for approximately 20 minutes in the same pot, without ever touching it, so that milk can curdle and coagulate. Using a slotted spoon, gently transfer ricotta in a fine sieve (even better if it's lined with cheesecloth) and let it drain until it reaches the desired consistency. Adjust with salt and keep it in the fridge.

Homemade Butter

Friday, January 8, 2010
Homemade Butter

When you're angry at something, make sure that the energy produced is not in vain. Do like me and follow this simple advice.

Get a carton of fresh cream of the highest quality (me, I can only dream of it at night, but you, you should get some fresh cream from the mountain pastures, and perhaps even call Heidi, Peter, Grandpa, Fabio Volo [famous Italian radio personality, en], you decide...), or rather, since you're at it, just take two cartons, pour everything in a good ol' bowl, and start whipping.
Whip, whip, with no fear, whip and beat with the mixer, cream starts swelling as usual, nothing new, keep going dauntless. Whip, whip, whip and beat, I promise that at some point the cream will get tired, deflate and become yellow of shame. And you hang on, whip, whip, whip and bash, and you already start feeling better. Whip and bash, and you'll see how your cream, all puffed up, in reality is just an easy lie.
Soon, very soon, cream gives in to your stubbornness - but what am I saying? - it really breaks apart: on one hand the lumps of butter, and on the other hand an opaque liquid they say it's buttermilk. Ah-ha! Two birds with one stone, even better.
You're almost there. At this point drain the liquid well, but you'd better remember to wash the butter under cold water several times until water comes out clear and limpid: this is the sign that all the stress, the anxieties and the darkness of the day have been washed out.
Done! Now you can take your butter between your hands and make sense of it, shape it round, rectangular or cylindrical. Spread it on bread with a little honey. What are you saying? You're not angry anymore?

That's perfectly okay, but before you go, remember this other trick: you can freeze the butter. SUPERCOOOOOOOOOL, isn't it?

Labna

Friday, September 4, 2009
Labna

I wanted to try this Lebanese cheese for a while. Nothing new under the sun, these cheese balls have been traveling all over the blogosphere for quite a long time, and before me they've been made, shot, eaten and praised by Sigrid, Virginia and ChicaJo, to name a few.

It may be unnecessary to tell you why this labna (or lubneh) immediately won me over, but since a few careless readers are probably pulling their hair out of curiosity, ans since I'm also a very nice girl, I'll tell you one more time. First of all, I'm totally in love with fresh cheeses, and I'm totally in love with those that are white, soft and creamy. Secondly, since not only I'm a very very nice girl, but I'm also a somewhat lazy girl, I have a slight preference for the recipes-non-recipes, the ones that require very few ingredients and absolutely no effort, but that always meet with success. It's so nice when your incredulous friend asks you Did YOU make this?? and you can safely come out in the open and admit that in reality it doesn't take much. And no matter how hard you try to convince him that Really, it's THAT easy, you can easily bet that no-one will ever believe you...

But after all, since I'm still a Girl In The Kitchen, I thought that in order to make this labna, I had to approach it in a roundabout way. Therefore, instead of starting from yogurt, I started from milk, with which I made yogurt, with which I then made labna. And yet, if I was a slightly more serious girl, I would have made from scratch even the pita bread to go with, but I decided to leave it to the next episode instead : )


Labna

yogurt (Greek style would be better) 1 quart
salt 2 teaspoons
spices of your choice (thyme, sesame seeds, oregano, pepper, sumac)
extra-virgin olive oil


Mix yogurt with salt and pour it into cheesecloth or a piece of fabric with a not too thick weave. If cheesecloth is loosely woven, fold it in two. Gather the four edges and tie them together to form a small bag. Hang the cloth with the yogurt over a bowl and let it drain in the refrigerator. Let it there for 24 hour to a maximum of three days, it depends on the yogurt thickness and on the texture you'd like the cheese to be.
Untie the cloth, collect the labna and form small balls. Season them with a mix of spices of your choice and drizzle with a bit of olive oil. Serve with warm pita bread.

Without Yogurt, What Blog Would It Be?

Tuesday, July 21, 2009
Homemade Yogurt

I know that yogurt has been featured over a thousand times on food blogs from the whole planet, with lactobacilli fermenting from here to Byelorussia, but I felt somewhat compelled to write a post about it myself.
Yogurt has always been welcomed in my fridge, ever since I remember being tall enough to open its door and take a peak of what was inside. During college, when finals were getting close and all of a sudden we were forced to study like crazy to make up for all the months we had wasted lazing around, me and my friend Michela used to eat yogurt with granola and a sliced banana for lunch or dinner. When we reached the point where we only had little time left but the pages to read were still endless, two things always came to rescue, the big coffee mug with chocolate chip cookies and the yogurt on sale with Buy 2, Get 1 Free type of deal.
Since I moved to the U.S, I couldn't’t find anything similar to European yogurt, not even when the labels clearly stated so, seducing me with their European Style illusion. I kept searching for months, trying every new product that I found on the supermarket’s shelves, and every time it was a disappointment. Until I discovered the way to make it myself.

The process itself is quite simple; the tricky part is finding the way to keep the bacteria at the same temperature for few hours, until yogurt is set. A little imagination in this case comes in handy. I personally wrap the big jar in a towel and I put it in the oven, turned on at the lowest setting, but everyone can find their own strategy, like placing it inside a wooden trunk or on a shelf next to the heater. Obviously, you can always cheat and buy the proper tool, (to which, I have to admit, I also gave in for few months), but I think that making it all by yourself gives a lot more satisfaction, other than being way more romantic : )
Homemade yogurt? Yes, you can!

Homemade Yogurt
for approximately 8 8oz. jars

milk 1 gallon
plain yogurt 3 and a half tablespoons
(this will be your starter; use a store-bought yogurt the first time, then you can start using some yogurt from your own batch)


Put milk in a large pan and bring it almost to the boiling point. Let it cool off, stirring it every once in a while, until it reaches 104F (between 40C and 42C). It will take approximately one hour and I recommend using a food thermometer to check the temperature.
In the meantime, take the starter yogurt out of the fridge and let it get approximately to room temperature. Turn the oven on to low/warm setting or prepare whatever “bed” you decided to use. Place 3 and a 1/2 spoons of yogurt in a large jar with lid (which should be room temperature as well; otherwise you'll kill the poor bacteria because of thermal shock!).
When milk has reached more or less 104F, put about a cup of it in the container with the starter and mix well. Add remaining milk, stir, and close the jar. Wrap it with a blanket, place it in the warm oven and leave it there for 4-5 hours. At this point yogurt should be set (don’t worry, I promise you’ll understand right away whether the bacteria did their work or not).
Place it in the refrigerator until cold. You can eat it as it is or, if you like it firmer, you can let it drip on a fine sieve.
I personally like it very firm, Greek style, and I let it strain for two hours or more. And it comes out so dense that if you serve it topped with a couple of spoons of honey and some chopped walnuts, you can even pass it as an excellent dessert : )