Home About me All the recipes. More or less organized Inspiration Wanna send me a note? Italian version

Purple Potato Ravioli with Won Ton Wrappers

Friday, December 17, 2010
Purple Potato Ravioli with Won Ton Wrappers

These won ton and I have become best friends. Especially now that the good ol' Imperia took off to new shores, and before I start pulling pasta sheets by hand...
I've already told you, haven't I, that won tons wrappers are easy to use, they don't require any flour because they don't stick to each other, they're so thin that the filling can be seen in transparency that it's a pleasure (and when the filling is purple, they are a such a jewel!), they're delicate and all in all you can even get used to their different texture? Of course, if you really want to commit yourself and prepare won ton dough from scratch, well, we're back to the same problem, but for now I'm quite pleased with the ones I get at Whole Foods, so beautifully squared out and ready to use. And I just found out that you can freeze them right as they come, stacked one on top of the other in their package. If need be, simply take out the freezer the desired number of squares, and they - to my amazement and wonder - won't oppose any resistance, coming off with ease.
I wouldn't go as far as saying that won ton give you the best ravioli in the world, because it's not true and because, despite appearances, I'm terribly romantic and pasta - especially when done by hand - will always hold a special place in my heart. What I can assert with confidence is that won ton will give you the fastest ravioli in the West, and that they will make quite an impression on a Thursday evening dinner of any given week.


Purple Potato Ravioli
with Won Ton Wrappers

for approximately 20-25 ravioli

purple potatoes about 500-600 gr.
goat cheese about 60-70 gr.
grated Parmigiano cheese 2 tablespoons
chives, salt, pepper to taste
won ton wrappers 8 per person
egg white to seal ravioli 1
butter, bread crumbs and garlic for the dressing to taste


For the filling, wrap potatoes in foil and cook them in the oven at 425 for 30 or 40 minutes, until they're soft. Peel and mash them while still hot. Allow them to cool slightly, then add the Parmigiano, goat cheese, salt, pepper and some finely chopped chives. Knead the filling with your hands until the cheese is smooth and well blended.
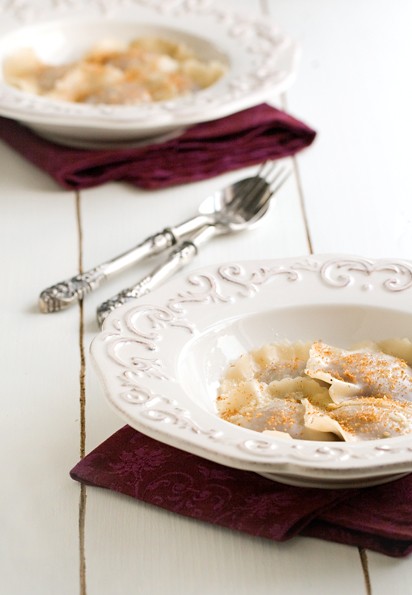
Place some won ton squares on the work surface (if you wish, cut them out with a ravioli cutter and give them a more proper shape...), and scoop a small amount of filling in the middle of each. Brush the edges with the egg white, slightly beaten (or with cold water), then cover each square with another won ton sheet, trying to eliminate any air bubble and pressing with your fingers to seal the ends.
Cook the ravioli in simmering salted water, and drain them after two minutes or right when they come back to the surface. Dress them with melted butter and a spoon of bread crumbs previously toasted in a pan along with a minced garlic clove.
Et voila.

Walnut, Apple and Raisin Scones - Arizmendi N.2

Wednesday, December 8, 2010
Walnut, Apple and Raisin Scones

Long time ago, more or less at the beginning of this blog, I had told you about this bakery with the strange name, and I had talked about its scones, its buttermilk brioches, and maybe even about its special cooperative management structure, a unique experiment in the local scene, where each employee becomes an equal partner, and enjoys the same pay as any other.
Well. Now I can imagine that the news I'm about to give will not make you scream of joy, but it's with great pleasure - mine and of everyone living in the southern neighborhoods - that I can finally announce the opening of the second Arizmendi in SF, tucked between a wine bar and a yoga studio on Valencia Street, envied by all the Pupuserias and PanaderĂ­as of the Mission district. And if that still doesn't mean anything, just think that from now on I can literally walk there. Because Arizmendi and I are now neighbors!
To celebrate this joyous event, I went and grabbed from the shelves an old acquaintance of mine, masterfully escaped from the massacre of few months ago. If I remember correctly, at the time of the first Arizmendi post, I had also promised to try all the scones in the book, one by one (and very wisely, I had also avoided giving myself a deadline for the project). Hence, after 15 months, 10 days and 9 hours, here they are, Walnut, Apple and Raisin Scones, aka Arizmendi No.2.


Walnut, Apple & Raisin Scones
for 10 small scones or 6 large ones

all-purpose flour 1 3/4 cups (225 gr.)
sugar 1/4 cup + 1 tablespoon (75 gr.)
baking powder 1/2 tablespoon
baking soda 1/4 teaspoon
salt 1/4 teaspoon
butter, cold 1 stick (115 gr.)
dried apples 1/2 cup (50 gr.)
walnut 2/3 cup (50 gr.)
raisins 1/4 cup (30 gr.)
buttermilk 1/4 cup + 1 tablespoon (75 gr.)
whipping cream 1/4 cup + 1 tablespoon (75 gr.)
sugar and cinnamon to dust the surface to taste


Sift the flour and mix it with sugar, salt, baking soda and baking powder. Add the cold butter, cut into small pieces, and mix quickly until the butter is fully covered with flour and it's broken into small bits. Add raisins, apples and coarsely chopped walnuts, and mix. Make a well in the middle of this mixture and pour in the cream and buttermilk. Mix quickly, just until the ingredients are sufficiently blended together. Shape the dough in small rounds of about 2 inches diameter for smaller scones, or about 3 inches diameter for six larger scones. Place the scones on a baking sheet covered with parchment paper, leaving them quite apart from each other, because they widen and flatten out during baking. Sprinkle the surface with 3 tablespoons of sugar mixed with some cinnamon and bake them at 375 for 20 or 30 minutes, until golden brown. Transfer them on a rack and let cool off. Right out of the oven, scones are very soft, and they will get firmer after cooling down. But they will still be very soft inside, thanks to the buttermilk.
You can make them in a second, and if you mix the dry ingredients the night before, you'll have them ready for breakfast in just about the time you can say Coffee! However, they should be consumed the same day.

Pear Jam with Chestnut Honey & Sage

Thursday, December 2, 2010
Pear Jam with Chestnut Honey & Sage

It's been a while since last time I made jams and marmalade. This year, summer inexplicably went by without leaving any trace between my cupboard's jars. An unforgivable mistake, indeed.
Inspiration magically came to me when I laid my eyes on, ehm...no, when I took possession of this thing here. Finally a book on jam making worthy of Christine Ferber, a 372-page volume full of irresistible colors and fragrance, a true ode to fruit, with a slightly retro style that won my heart.
Blue Chair Fruit is a fairly famous name here, some sort of cult for all those who happily hang out at farmers markets and specialty bakeries on Saturday mornings, a love song for the simplest of all breakfasts, a celebration of local and seasonal products, and yet another embodiment of the American dream.
Ok, I have to admit I'm a little biased, but trust me for now, and then, when you happen to be around here, I'll reward you with a tour de force on the streets of San Francisco, hunting for meyer lemons, early girl tomatoes, pluots and cranberries.
It's a done deal!


Pear Jam
with Chestnut Honey & Sage

for 3 medium jars

ripe pears, net 1,300 gr.
(I used Asian pears)
sugar 400 gr.
lemons 2
chestnut honey 1 tablespoon
apple cider vinegar 1-2 teaspoons
fresh sage leaves 5-6


Peal and core pears, and cut them in small cubes. Add sugar and juice of lemons, and mix well. Cover with plastic and refrigerate overnight.
The next day, pour everything in a large pot and bring to boil, stirring every once in a while. Let it cook for about 20 minutes, then puree about 1/3 of the mixture. Pour it back in the pot and keep cooking for another 20-30 minutes, or until jam reaches desired consistency, skimming when necessary. Add apple cider vinegar and one tablespoon of chestnut honey, stir well and cook for 1-2 minutes longer. Turn off the heat, add sage leaves, previously washed and pat dry, and let them sit for about 6-7 minutes (don't worry, their taste will become less intense once jam cools down). Discard sage, then pour the jam in cleaned and properly sterilized glass jars. Cover with lids, place the jars in a pot of boiling water, and boil for 20 minutes. Turn off the heat and let the jars cool off in the same water to create vacuum.

Inspired by Pear Jam With Chestnut Honey & Sage, The Blue Chair Jam Cookbook, by R. Saunders